Versions Compared

Key

  • This line was added.
  • This line was removed.
  • Formatting was changed.

...

Document Properties Marker
hidetrue
overridefalse


Short DescriptionLearn about the central most heavily used macros of your projectdoc Toolbox. 
Doctypetopichide
NameThe Workhorse Macros 
Parent
Parent Property
propertyParent
property-nameName
 
Audience
Name List
doctyperole
render-no-hits-as-blanktrue
render-list-as-comma-separated-valuestrue
namesDocumentation Architect, Author
propertyAudience
 

Level of Experience
Name List
doctypeexperience-level
render-no-hits-as-blanktrue
namesNovice
propertyLevel of Experience
 

Expected Duration 
Subject
Name List
doctypesubject
propertySubject
 
Categories
Name List
doctypecategory
propertyCategories
 
Tags
Tag List
propertyTags
 

Iteration
Iteration
valuefilled
hide
Type
Name List
doctypetopic-type
render-no-hits-as-blanktrue
namesTutorial
propertyType
 

Previous StepDoctypes in Detailhide
Next StepCategorizationhide
Sort Key000500hide


...

Section
titleBackground Information


Expand
titleShow background information ...

The central macros of the projectdoc Toolbox are:

Tour
render-as-definition-listtrue
replace-title-with-nametrue


Section
titleDocument Properties Marker Macro

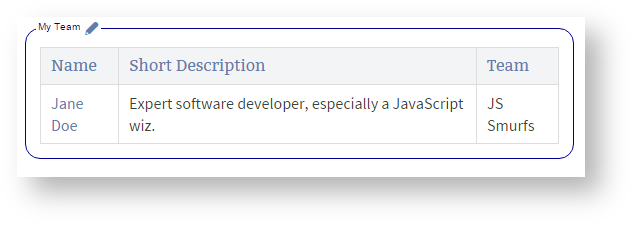
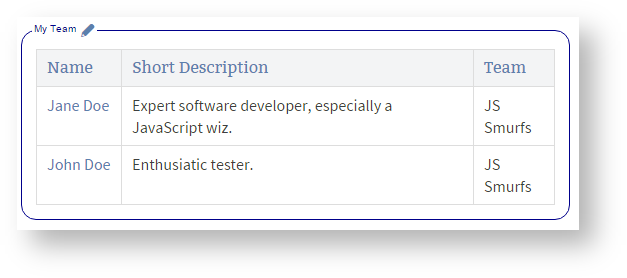
The Document Properties Marker Macro contains a three columned table with the document properties. Authors will rarely add this macro to a page since this is the job of the template author.

Nevertheless the author uses the macro by editing existing properties or adding new properties to it.

The three columns contain the

  1. name,
  2. the value,
  3. and controls

of the property. Every property is on its own line.

The most used property control is probably the hide control. It prevents the property from being rendered in the table. You may even opt to hide the whole table with the Hide parameter of the macro.


Transclusion
render-document-name-as-headingtrue
taget-heading-level*
documentSection Macro
ids-Description, !*


Transclusion
render-document-name-as-headingtrue
taget-heading-level*
documentDisplay Table Macro
ids-Description, !*


Transclusion
render-document-name-as-headingtrue
taget-heading-level*
documentTransclusion Macro
ids-Description, !*


...

Section
titleHands-on Steps


Section
titleUse the Document Properties Marker Macro
  1. Open the person document from a previous step for editing
    Image RemovedImage Added
  2. Go to the Team property you have added; in the last column type 'hide'
  3. Save the document

The line with the Team property is no longer shown.

Image RemovedImage Added


Section
titleUse the Section Macro
  1. Open the person document from a previous step
  2. Add a new Section after the Description section called 'Questions'
  3. Add a section within this section and name it 'Question One'
  4. Add some lines to the body of the Section Macro
  5. Add a second section 'Question Two' as a sibling to the section named 'Question One'
  6. Do not add text to the body
  7. Save the document

    The section named question and the sibling that contains text is shown.
  8. Open the person document again
  9. Remove the text from the section named 'Question One'
  10. Save the document

Image RemovedImage Added

The question section with its two children contains no text and is therefore not rendered.


Section
titleUse the Display Table Macro
  1. To run some tests we add a second person document to the index space
  2. Click 'Create'
  3. Put John to his sister's team
  4. Create a document of type 'Topic' in the 'My Workspace' space
  5. Send it to its homepage
  6. Add a new section called 'Members of the Team'
  7. Add a Display Table Macro to its body
  8. Select on doctype 'role' and display three columns: Name, Short Description, Team
  9. Save the macro
  10. Save the page

The page renders as follows:

  1. Click on 'John Doe', edit the page and change the team name to 'True Testers'
  2. Check the table on the 'My Team' page
  3. Edit the 'My Team' page
  4. Add a where clause to the Display Table Macro to select only on the 'JS Smurfs' team
  5. Save the macro
  6. Save the page

The result table contains only one hit.

For more information on search options,visit Search Tips.


Section
titleUse the Transclusion Macro
  1. Go to the homepage of 'My Workspace'
  2. Edit the page
  3. Add the Transclusion Macro to transclude the section 'Members of the Team'
  4. Save the macro
  5. Save the page
  6. Put John to the 'JS Smurfs' team

    Tip Box

    If you lost track of John, find the Person homepage: Go to the index space or your workspace homepage and click the link "Persons".


  7. Go to the homepage of 'My Workspace'
Note Box

Note that the transclusions are not cached. If they were cached, the result my show a stale fragment. This is due to the fact that dynamic content does not match well with caching. Therefore you should either do not transclude dynamic content or you may select the transclusion to not be cached.

  1. Go to the homepage of 'My Workspace'
  2. Edit the page
  3. Add a section with title 'Test'
  4. Move the transclusion macro to the body of this new section
  5. Edit the transclusion macro
  6. Change the target level to '*'
  7. Save the macro
  8. Save the page

Note that the level of the transcluded section is automatically set to '2'. The section is originally at level '1'. We set the target level to '*' to request projectdoc to calculate the level of the transcluded section automatically to match that of the enclosing section plus one. Note that this feature only works with sections and not with pure headings.


...

 
Section
required-permissionswrite-access
titleNotes


Section
titleReferences


Section
titleResources

...