 Project reports provide metadata about a project. This information answers questions like these:
- What is the test coverage?
- How well does the code adhere to the given coding standards?
- By which parameters has the project been built?
- What has been changed since the last release?
- What is the meaning of error codes issued by the library/application?
- By what properties can the library/application be configured?
The answers provide transparency to users of the project.
Attaching Metadata
Report information rendered in a project site makes it easily readable for humans. If you want to use some of this data in your build process, an easily parsable format would be much more convenient than grabbing the information from an HTML page. If the metadata is attached like a Maven site and stored in the artifact repository, writing plugins that read and display this information would be very comfortable. It also allows to mashup figures from different reports, even different projects, and draw new conclusions.
Aggregation Reports
In a multi project configuration Maven already allows to aggregate reports. This is useful since questions about quality metrics are often directed to the whole project and not only to its parts. There should be one report on code coverage to consult with no need to traverse the submodules individually.
What is true for a multi project configuration is also true for a more loosely coupled project spanning multiple individual projects. This is either necessary, since each project has its own lifecycle, or just convenient, because loosely coupled projects follow the delivery pipeline principle (please refer to Jez Humble in Continuous Delivery: Anatomy of the Deployment Pipeline) easily:
Only build your Binaries once.
Loosely coupled projects help to reduce the complexity and increase the speed of release builds. If the release of a large project can be built on top of released sub projects, the release is much easier to handle. The drawback is that you have to deal with releasing multiple projects before you are able to release your whole product. Running a release must be reduced to a non-event to handle this appropriately.
Support by Maven Reports
While some Maven plugins, like the Maven Javadoc Plugin provide means to create an aggregate report for projects that are not part of a multi module build (please refer to Aggregating Javadocs from Dependency Sources for details), some reports don’t. For some reports it would be easy to merge report data. An issues report may merge issues marked as ‘new-and-noteworthy’ into a global new and noteworthy report. Other reports may need to be restructured to run on pre-generated report results.
Maven Plugin to attach Metadata
The next step is to make this information available with the semantic web. Until then, the Projectmetadata Maven Plugin allows to gather project metadata and make it accessible due to attached project artifacts.
![]()
The initial release of smartics Properties has been published! The version tag is 0.1.0, since this is the first release of a project that is based on our smartics Exceptions, but features a bunch of new concepts.
(Do not be confused if the minor number has already changed, since we continuously update the documentation. :-))
This post introduces the basic concepts of this project.
Declaration of Properties
The declaration of properties is modern and much simpler than in the old days. Simply write a Java interface and add the @PropertySet annotation.
@PropertySet("my")
public interface MyProperties {
  String myString();
  URL myUrl();
  List<String> myList();
  MyCustomType myCustomType();
}
With its declaration a property type, constraints and metadata is determined.
Definition of Properties
Providing a value for a declared property is called definition of a property. This can be done in a couple of ways like a simple properties file on the classpath or in a folder on the file system. Or it may be stored in a database or other sort of backend information system.
The definition of the properties declared above in a properties file may look like this:
my.myString=Hello Properties!
my.myUrl=http://www.maycorporation.com/index.html
my.myList=one, two, three
my.myCustomType=purple:123
Please note that the name of the property set (my) is required as a prefix.
Accessing Properties
It is important that the way properties are accessed is independent of how the properties are defined. Therefore an implementation provides a factory that is able to create configurations. A configuration is a set of property sets. Each property set is a collection of properties. While a configuration is specific to an environment and maybe an application within that environment, a property set is not.
It is an implementation detail how a factory is configured to be able to provide configurations to its clients (please refer to the library’s homepage for details – e.g. One-String-Property Tutorial for an implementation that provides access to properties deployed on the classpath).
final ConfigurationPropertiesFactory factory =
    ConfigurationPropertiesFactoryFactory.createDefaultFactory();

final ConfigurationPropertiesManagement config =
    factory.createDefaultManagement();
The code above creates a default configuration.
The following code snippet shows how to access properties:
final MyProperties properties =
  config.getProperties(MyProperties .class);
final String myString = properties.myString();
final URL myUrl = properties.myUrl();
final List<String> myList = properties.myList();
final MyCustomType  myCustomType = properties.myCustomType();
You will find more information on the project’s site, especially on the tutorial pages and the smartics Properties Maven Plugin for integration with Maven.
If you have questions or comments, please do not hesitate to leave a comment or drop us a line!
There is always the need for good documentation if a system or API lacks intuitive handling. For simple tasks this should never be the case, but to accomplish more complex tasks this is often necessary. Documentation is not only the printed manual, it is also context sensitive help that leads to an information system with additional advice for the task at hand. In whatever form the documentation is presented, there are some common attributes a good documentation requires. Two of them are correctness and being up-to-date. Let’s focus on the need of documentation for a software product being up-to-date with the implementation, since being out-of-date implies that the information is no longer correct. How can this be accomplished?
Living Documentation
One answer is given by Gojko Adzic in his book Specification by Example: Living Documentation. What is living documentation?
Living documentation is a source of information about system functionality that’s as reliable as programming language code but much easier to access and understand.
Gojko Adzic
Behavior Driven Development Tools
That opens a wide spectrum of technologies. One set of tools are found in the world of behavior driven development (BDD) (for more information on BDD please refer to “Introducing BDD” by Dan North), e.g. Cucumber or JBehave (please refer to Resources on the Specification by Example’s website for a list of additional tools). These tools make specifications executable and allow to gain more transparency on what the code does compared to what it was designed to do. If there is a discrepancy, these tools will tell immediately.
Reports
But BDD tools are not the only utilities that support living documentation. Gojko Adzic names one problem in today’s software development process that is addressed by the living documentation approach:
Code is often the only thing we can really trust; most written documentation is outdated before the project is delivered. Gojko Adzic
Robert C. Martin states another in his book Clean Code:
The older a comment is, and the farther away it is from the code it describes, the more likely it is to be just plain wrong.
Robert C. Martin
And he comes to the conclusion:
Comments are, at best, a necessary evil.
Robert C. Martin
We argue that a comment is a form of documentation that relates to an implementation detail. So we can rephrase the cites of Robert C. Martin to:
The older a documentation is, and the farther away it is from the code it describes, the more likely it is to be just plain wrong.
Documentation is, at best, a necessary evil.
This is true for everyday’s devices like mobile phones. A documentation delivered with the device may be out of date after the first software update and as a user we do not want to have to consult a manual prior to enjoying its services. This is also true for software documentation. A document, especially written with a tool designed for creating slides or letters, will loose its benefit over time (as the burden of maintaining the document consumes scarce resources and details may evade the maintainer’s eye) until it does more harm than good (at the time it is out of date and its information is no longer correct). It would be honest to admit that such a document is created only to preserve a snapshot on information about the software, as soon as the burden of maintenance is greater than its benefit as a source of correct information.
Generating Reports
The cites of Gojko Adzic and Robert C. Martin direct us to the conclusion that we want our documentation to be as minimal and as next to the code as possible. Therefore it is useful to create reports that make the information in the code more accessible and easier to understand. We have released a set of tools that do exactly this (and are continuously working on the improvement of these tools):
- smartics-testdoc-tools – visualization of tests as stories, similar to the goals of agiledox, written by Chris Stevenson back in 2003.
- smartics Properties – provides a library to use properties and generate a documentation within a Maven project site.
- smartics Exceptions – provides a library to use exceptions and document the meaning of exception codes.
These projects have in common that they analyse (test and production) code and generate reports. They help to synchronize the implementation with the documentation at no additional cost (besides configuration of the tools and adding a few metadata to the code). If the code is changed, the documentation is updated automatically. The tools allow developers to comment their work and make this documentation also visible to non-coders. For many projects this information is enough. For projects having requirements such as multilingual documentation or documentation that is written by a technical writer, these reports can be used as a foundation for this additional work.
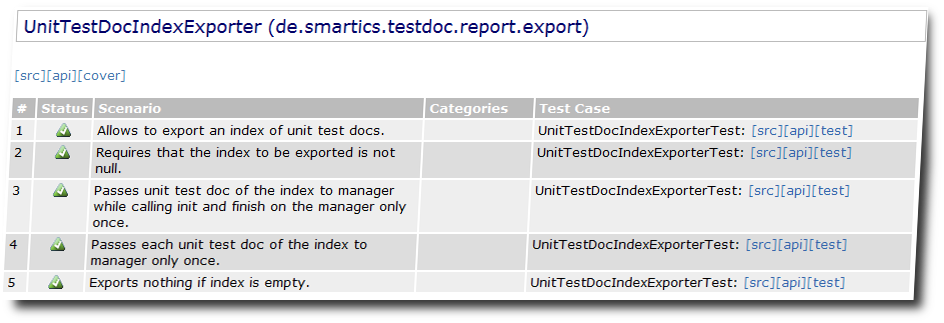
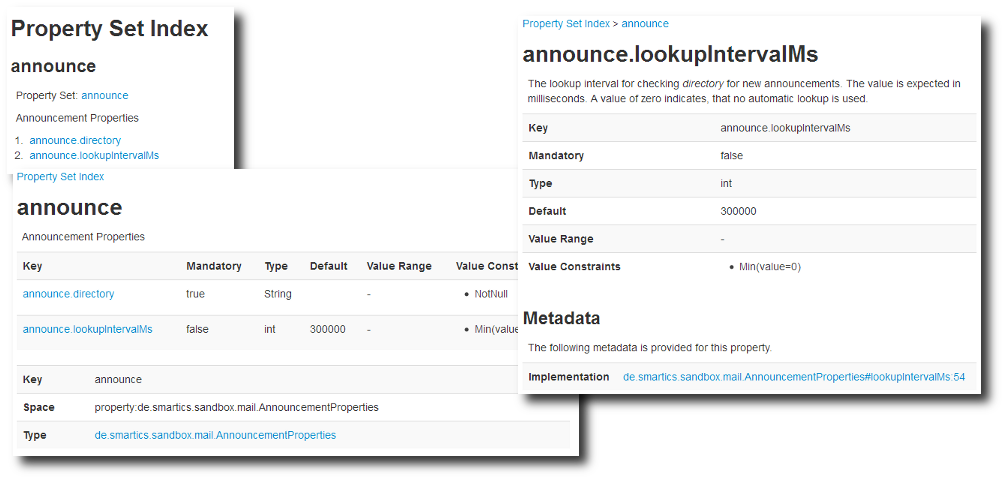
Screenshots of Reports
Here is an example on a testdoc report generated by smartics-testdoc-tools:
This an example of a report on properties generated by smartics Properties:
This an example on a report on exception codes generated by smartics Exceptions:

If you are interested how to use these tools in your project, please consult the project’s sites:
| Project | Short Description |
|---|---|
| This project provides tools to generate documentation from tests written in Java. Currently the tools concentrate on making the story behind tests visible. They use the tests to generate a documentation from executable code. Since the test code itself is documentation, we talk about executable documentation. |
| smartics-properties is a library for Java to declare and define properties and to access them from an application in a convenient way. Convenience means that properties are easily
There is also a plugin to generate properties reports with Maven. |
| This project provides Java libraries to make exception handling in applications easier. The following services commonly required for application, be them standalone or distributed multi-tier enterprise applications, are addressed:
|
In his article Eine Lanze für XML brechen (translated to Taking up the Cudgels for XML by leo.org) Philip Ghadir reminds us of the many benefits of XML.
- easy to read by humans due to tag names (if the semantics of the tags are published, otherwise it may be easy to guess the meaning or not dependent on the document at hand)
- defined way to specify the encoding within the document
- defined way to reference a document type or schema
- defined way to add links to other documents
- defined way to add processing instructions
- defined way to add comments
- defined way to mix elements/attributes from different sources in one document with the help of namespaces
- defined way to specify selections on document parts with XPath
- defined way to run transformations with XSLT
Where XML is ill-reputed for its verboseness and in every way less cool than e.g. JSON (please note that neither the article of Ghadir nor this blog post wants to compare the two formats since there are simply use cases for both), Philip Ghadir shows in his article how XML’s features can be used to increase the acceptance for its documents. In one of his examples he shows how to add CSS to provide a pretty view an the data, in another he shows how to transform a document using XSLT. You may have a look at Ghadir’s article and the example code given therein.
Although I like DSLs that provide a concise and elegant way to write documents, XML is still that multipurpose markup language I often use in my projects. And if I am in need for a new type of XML document, I always add an XML schema (XSD) to define its valid structure. Annotations allow to add comments so that human readers are able to understand the semantics of the document elements. But the declaration of elements in an XSD document tend to be very verbose. If I have to write one (I’m not doing it on a daily or weekly basis), I always have to lookup even basic concepts since I cannot remember how to spell them out correctly.
The following examples form my personal cheat sheet I hope that may be of use for you, too.
Documentation
Documentation allows to explain what the intended use for an element or attribute is. The documentation is part of the annotation to an element.
Element
<xsd:element name="my-element">
  <xsd:annotation>
    <xsd:documentation>
       Documentation for the element...
    </xsd:documentation>
  </xsd:annotation>
  ...
</xsd:element>
Attribute
<xsd:attribute name="my-attribute" type="xsd:string">
  <xsd:annotation>
    <xsd:documentation>
      Documentation for the attribute...
    </xsd:documentation>
  </xsd:annotation>
</xsd:attribute>
So the pattern for adding documentation is always the same.
Elements with Attributes
Adding attributes to elements is an often required task. For complex types the declaration is quite intuitive. Less so for elements with simple content or no content.
Complex Element
Okay, the easy one first!
This is what I want to specify in my XML document:
<my-element my-attribute="true">
  ...
</my-element>
This is how the XSD snippet looks like:
<xsd:complexType name="my-element">
  <xsd:sequence>
    ...
  </xsd:sequence>
 <xsd:attribute name="my-attribute" type="xsd:boolean"/>
</xsd:complexType>
Element with simple Content
If I want an element with simple content I often forget the extension part.
This is what I want to specify in my XML document:
<my-element my-attribute="true">Text content</my-element>
This is how the XSD snippet looks like:
<xsd:element name="my-element">
 <xsd:complexType>
   <xsd:simpleContent>
     <xsd:extension base="xsd:string">
       <xsd:attribute name="my-attribute" type="xsd:boolean"/>
     </xsd:extension>
   </xsd:simpleContent>
 </xsd:complexType>
</xsd:element>
Element without Content
An element without content simply omits the extension part.
This is what I want to specify in my XML document:
<my-element my-attribute="value"/>
This is how the XSD snippet looks like:
<xsd:element name="my-element">
  <xsd:complexType>
    <xsd:attribute name="my-attribute" type="xsd:string"/>
  </xsd:complexType>
</xsd:element>
Global Attributes
If we simply reference an attribute we have to add the namespace. This is very inconvenient for the author and the (human) readers of an XML document. Therefore use attribute groups, even if the group contains only one attribute.
<xsd:attributeGroup name="my-attribute">
 <xsd:attribute name="gav" type="xsd:string" use="required">
   <xsd:annotation>
     <xsd:documentation>
        Documentation for the attribute...
     </xsd:documentation>
   </xsd:annotation>
 </xsd:attribute>
</xsd:attributeGroup>
Reference the attribute group like this (tns is the target namespace):
<xsd:complexType name="MyType">
  <xsd:attributeGroup ref="tns:my-attribute"/>
</xsd:complexType>
Restriction to Enumerations
If the author of an XML document should only be allowed to select a value from a finite list, the enumeration is the construct to choose. Note that you can add documentation to the enum type and the single enumeration values.
 <xsd:simpleType name="my-enum">
   <xsd:restriction base="xsd:string">
     <xsd:enumeration value="story" />
     <xsd:enumeration value="epic" />
     <xsd:enumeration value="constraint" />
     <xsd:enumeration value="spike" />
   </xsd:restriction>
 </xsd:simpleType>
Element Content
And now some recurring patterns of element content.
Any Content
The following declaration allows any content.
<xsd:sequence>
   <xsd:any
     processContents="lax"
     minOccurs="0"
     maxOccurs="unbounded" />
</xsd:sequence>
Elements from a Set
If you want to allow elements from a given set, in arbitrary order, any number of occurrences, use this:
<xsd:sequence maxOccurs="unbounded">
 <xsd:choice minOccurs="0" maxOccurs="unbounded">
   <xsd:element
     name="elementA"
     type="tns:A"
     minOccurs="0"
     maxOccurs="unbounded">
   </xsd:element>
   <xsd:element
     name="elementB"
     type="tns:B"
     minOccurs="0"
     maxOccurs="unbounded">
   </xsd:element>
 </xsd:choice>
</xsd:sequence>
CDATA Content
XML does not distinguish between simple content and content that contains character data (CDATA). Therefore the declaration for
<my-element>value</my-element>
and
<my-element><![CDATA[ ... text ... ]]></my-element>
is the same:
<xsd:element name="my-element" type="xsd:string"/>
Resources
The resources I typically consult are:
PlantUML is a cool tool to integrate UML and Ditaa diagrams easily by a short text syntax into your documentation. The source code for a UML diagram may look like this (example taken from PlantUML’s homepage):
@startuml path/to/image.png
Bob -> Alice : hello
Alice --> Bob : OK
@enduml
PlantUML will generate a PNG image and store it to the given path.
There are two big points for this tool to make it very productive:
- You can write the diagrams in any editor very quickly. You cannot tweak the layout of elements, which makes creating diagrams even faster.
- You can write the diagram in any text file and let PlantUML find that location and create the image. There is no need to switch tools or bother with the administration of files: documentation file, image file, and possibly the image source file.
The last point is even cooler if you have a look on tools for which a PlantUML plugin is provided. So there is a good chance that you can use PlantUML with many tools you use.
Let’s have a look at the integration of PlantUML with Maven to support editing diagrams the PlantUML-way in Java source code and site documentation.
Javadoc
Write a diagram to a Java source file
First let’s add a diagram to a Java source file and reference it from its Javadoc.
package de.smartics.bar;
/*
 * @startuml de/smartics/bar/doc-files/image.png
 * Bob -> Alice : hello
 * Alice --> Bob : OK
 * @enduml
 */
/**
 * TEXT TEXT TEXT ...
 *
 * <img src="doc-files/image.png"/>
 */
public class Foo {
  ...
}
Please note that we place the image above the Javadoc comment (other than shown in the example on the homepage of PlantUML), since static analyzers otherwise will have difficulties in mapping the comment to the Java element and issue a warning.
To preserve the directory structure we also reproduce the package path to store the generated image in the appropriate subfolder. Placing images in a doc-files subfolder in a package folder is the intended way of adding images to the API documentation.
Running with Maven
The team of the PlantUML tool also provides integration with Maven in form of the Maven PlantUML Plugin. One tip: Add two executions to build images in the case of the site and the javadoc artifact.
<plugin>
  <groupId>com.github.jeluard</groupId>
  <artifactId>maven-plantuml-plugin</artifactId>
  <version>7940</version>
  <configuration>
    <sourceFiles>
      <directory>${basedir}/src/main/java</directory>
      <includes>
        <include>**/*.java</include>
      </includes>
    </sourceFiles>
  </configuration>
  <executions>
    <execution>
      <id>plantuml-javadoc-site</id>
      <goals>
        <goal>generate</goal>
      </goals>
      <phase>pre-site</phase>
      <configuration>
        <outputDirectory>${basedir}/target/site/apidocs</outputDirectory>
      </configuration>
    </execution>
    <execution>
      <id>plantuml-javadoc</id>
      <goals>
        <goal>generate</goal>
      </goals>
      <phase>generate-sources</phase>
      <configuration>
        <outputDirectory>${basedir}/target/apidocs</outputDirectory>
      </configuration>
    </execution>
  </executions>
</plugin>
cycles and you cannot rely on them without writing a plugin that explicitly tests that the generated image are up-to-date.
Maven Site
Write a diagram for the Maven site
Adding a diagram to a XDoc document is also very easy:
<document>
  <properties>
    <title>my-title</title>
  </properties>
  <body>
    <section name="my-title">
      <p>
        TEXT TEXT TEXT ...
      </p>
      <!--
        @startuml myimage.png
        X -> Alice : hello
        Alice -> X : OK
        @enduml
       -->
      <img src="myimage.png"/>
    </section>
  </body>
</document>
Please note that a XML comment puts constraints on the syntax being used within the diagram. Two consecutive dashes (--, e.g. -->) are not allowed in a comment. This seems to be an unresolved issue.
A workaround is to use a div element that is hidden:
<div style="visibility:hidden">
@startuml diagrams/project-overview.png

X -> Alice : hello
Alice --> X : OK
@enduml
</div>
Running with Maven
The following configuration of the Maven PlantUML Plugin allows to place text files (with the extension .xml or .txt) within the site folder to generate image files to be referenced from XDoc files.
<plugin>
  <groupId>com.github.jeluard</groupId>
  <artifactId>maven-plantuml-plugin</artifactId>
  <version>7940</version>
  <configuration>
    <verbose>false</verbose>
    <format>png</format>
  </configuration>
  <executions>
    <execution>
      <id>plantuml-site</id>
      <goals>
        <goal>generate</goal>
      </goals>
      <phase>generate-sources</phase>
      <configuration>
        <sourceFiles>
          <directory>${basedir}/src/site</directory>
          <includes>
            <include>**/*.xml</include>
            <include>**/*.txt</include>
          </includes>
        </sourceFiles>
        <outputDirectory>${basedir}/target/site</outputDirectory>
      </configuration>
    </execution>
  </executions>
</plugin>
Our default folder for text files containing only PlantUML diagrams is src/site/plantuml.
And Confluence?
For Confluence the free add-on PlantUML for Confluence to add diagrams with PlantUML to your wiki.
More Add-ons for Software Developers?
The projectdoc Toolbox for Confluence supports agile team in their task to communicate with stakeholders. For instance developers need to
- communicate the architecture of a software system,
- provide user documentation for Java libraries or Maven plugins
- or simply want to keep a journal to track interesting ideas and findings.
For all of that the projectdoc Toolbox provides macros and doctypes (also know as templates or blueprints) to make these tasks much easier.
Here is some information to get you started:
 Usually we use mockito for creating our test spies, because this test spy framework is effective and easy to use. Unfortunately creating spies for final classes is not supported.
In our case we wanted to fake a return value of a java.lang.reflect.Method, which is final:
import java.lang.reflect.Method;

import static org.mockito.Mockito.spy;
import static org.mockito.Mockito.when;

public class MethodTest {
  ...

  final Method spy = spy(METHOD);
  when(spy.getName()).thenReturn("unknown");

  final SerializableMethod uut = new SerializableMethod(spy);

  ...
}
In the code snippet "METHOD" is a reference to a Method instance. SerializableMethod is the unit-under-test (UUT) that holds a reference to the mocked java.lang.reflect.Method instance.
Using mockito will show the following stack trace:
Caused by: org.mockito.exceptions.base.MockitoException:
Cannot mock/spy class java.lang.reflect.Method
Mockito cannot mock/spy following:
  - final classes
  - anonymous classes
  - primitive types
	at test.de.smartics...MethodTest.createUut(MethodTest.java)
	... 26 more
The exception states loud and clear that mockito is not created for mocking final classes.
Now PowerMock comes for rescue. PowerMock adds (among other things) the ability to mock final classes to mockito. Let's have a look how the snippet from above needs to be changed in order to use PowerMock:
import java.lang.reflect.Method;

import org.junit.runner.RunWith;
import org.powermock.core.classloader.annotations.PrepareForTest;
import org.powermock.modules.junit4.PowerMockRunner;

import static org.powermock.api.mockito.PowerMockito.spy;
import static org.powermock.api.mockito.PowerMockito.when;

...

@RunWith(PowerMockRunner.class)
@PrepareForTest(SerializableMethod.class)
public class MethodTest {
  ...

    final Method spy = spy(METHOD);
    when(spy.getName()).thenReturn("unknown");

    final SerializableMethod uut = new SerializableMethod(spy);

  ...
}
So this are the changes: All we have to do is use the PowerMockRunner and instruct PowerMock to prepare our class that uses the spy class with PrepareForTest (for details on preparing classes for using system classes – like java.lang.reflect.Method – , please refer to Mocking system classes). Then we replace the spy and when methods of Mockito with their PowerMock counterparts, as you can see with a glance at the imports.
That’s it! ![]()
For Maven users the integration of PowerMock is very simple, you only have to check that the version of mockito matches that of PowerMock as shown in Using PowerMock with Mockito on the PowerMock's Wiki. This is what we use in our example:
<properties>
  <mockito.version>1.9.5</mockito.version>
  <powermock.version>1.5</powermock.version>
</properties>

<dependencies>
  <dependency>
    <groupId>org.mockito</groupId>
    <artifactId>mockito-all</artifactId>
    <version>${mockito.version}</version>
    <scope>test</scope>
  </dependency>

  <dependency>
    <groupId>org.powermock</groupId>
    <artifactId>powermock-module-junit4</artifactId>
    <version>${powermock.version}</version>
    <scope>test</scope>
  </dependency>
  <dependency>
    <groupId>org.powermock</groupId>
    <artifactId>powermock-api-mockito</artifactId>
    <version>${powermock.version}</version>
    <scope>test</scope>
  </dependency>

  <dependency>
    <groupId>junit</groupId>
    <artifactId>junit</artifactId>
    <version>4.8.2</version>
    <scope>test</scope>
  </dependency>
</dependencies>
There is only a minor drawback if you are using Eclipse with EclEmma since the current version 2.2 of EclEmma does not notice lines executed with PowerMock. Fortunately Cobertura does. In our case we use
<plugin>
  <groupId>org.codehaus.mojo</groupId>
  <artifactId>cobertura-maven-plugin</artifactId>
  <version>2.5.1</version>
</plugin>
We hope we have shown how easily mockito's capabilities can be extended with PowerMock. Enjoy!