
Test Stories
Introduction
Kent Beck on Software Engineering Radio, Episode 167: The History of JUnit and the Future of Testing with Kent BeckI want my tests to read like a story.
Every unit test tells a story about the unit under test (UUT). It shows how it is intended to be used and the result of the test run shows, if a particular feature is broken, not yet implemented or working.
Naming
An important part of the documentation is the name of the test method itself. The name should express the intention, the feature, not some technical details. So calling a test method
testsAddingElementsWorks
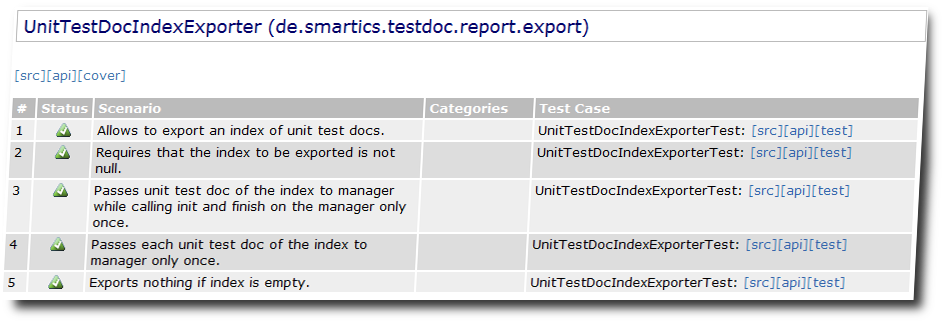
does not tell much about the unit being tested. If our unit is a set implementation, the following test method names will provide a much clearer view on the features of this unit (e.g. if the reader does not know what a set is):
- allowsToAddAnElementToAnEmptySet
- toleratesAddingTheSameElementTwiceSilently
- allowsToBeQueriedAboutTheNumberOfElementsInTheSet
- allowsToCheckIfSetIsEmpty
- allowsToIterateOverTheElementsInTheSet
- ...
Reading these method names allows the reader to get a picture of the unit being tested.
Unfortunately the test method names in their camel case form are harder to read than the features text on the product's cardboard box. Also being interested in the names only, the code itself is a form of distraction. Although the outline of an editor is provided by any IDE, a report that contains only the names in an easy to read sentence form is quite handy. TestDox by Chris Stevenson is to our knowledge the first tool (in form of a Maven 1 plugin) that allows to make readable sentences from the test method names. The smartics testdoc project also makes this translation, but also connect to the test source code (created by the maven-jxr-plugin) to read the whole story of the test.
The Story being told
The name of the test does not make the complete story. So it is important to have a link to the test code to really get the whole picture.
The report will also link to other reports, like the Javadoc or the test report. Each link and each column of the table can be configured to be not shown, so that the report shows only the information that is relevant to the intended audience.
Level of the Story
As there are tests on different levels, like unit tests, performance tests, or acceptance tests, the stories being told are also on different levels and target different audiences. To characterize a test use the JUnit @Category annotation.
Goal
The goal of using test stories is to provide valuable and executable documentation on the components of your projects. The reports allow to control the quality of the test code, especially the naming of the test methods.
The reports also make it easy to find the test code for a particular tested class. While there is often a 1:1 relation between the tested class and the test case class that tests it, we often find us writing test cases in different test case classes. This has sometimes semantical reasons to group tests with a certain aspect, but often also technical reasons, when tests require a different test setup or fixture.
Getting started
So what do you have to do, to try this out for your projects?
- First you need to tag the UUT that is tested by the test case. Usage of Annotations shows how to do this.
- Second you need to define the reports you want to create. Currently we provide the reports in two forms: As a traditional Maven report that is easily integrated into the site documentation and an XML report that can be further processed to create individual reports. Using testdoc-maven-report-plugin shows how to do this.
- Third: If you are using the Eclipse IDE you may want to have a look at the testdoc-plugin for Eclipse to integrate a view on the test stories into your development environment.
- If you are interested in a raw XML report without the links and localized information found in the report, you may want to have a look at Using testdoc-maven-plugin to learn how to use this. But this is an optional step and may be helpful in case you want to further process the information and add additional information to it.