 Our open source projects have been available on our own SVN server. Now we moved a couple of them to GitHub!
We hope that this will make it easier for the community to fork and experiment with these tools.
Here is the list of projects that moved this week:
- Buildmetadata Maven Plugin
- Projectmetadata Maven Plugin
- Alias Maven Plugin
- smartics Alias Config
- smartics Enterprise Architect Maven Plugin
- smartics Enterprise Architect Maven Plugin Example
The smartics JBoss Modules Maven Plugin and Config smartics JBoss Modules had moved in the past and are still found in GitHub.
To make it easier for developers to start on a stable tag, these projects have been released. With the exception of the smartics Enterprise Architect Maven Plugin project which is not meant to be employed by users, but serve as an example on how to use the smartics Enterprise Architect Maven Plugin.
We are continuing with moving projects to GitHub and Bitbucket. If you have questions or preferences on projects you want to see moved with higher priority, get in touch!
 Spaces are a great tool to evolve and refine knowledge or to accumulate information on a given topic. You may also work collaboratively with your team to create user information on one of your products.
This is the last article of the short series of articles on blueprints. We will introduce some concepts and tools on how to create spaces in Confluence and work with them productively right from the start.
Standard Space Blueprints
The standard space blueprints help new users to get started quickly. Therefore they render a number of actions new users want to run on their new spaces.
Here are two examples of space homepages right after space creation:
Blank Space
![]()
Documentation Space
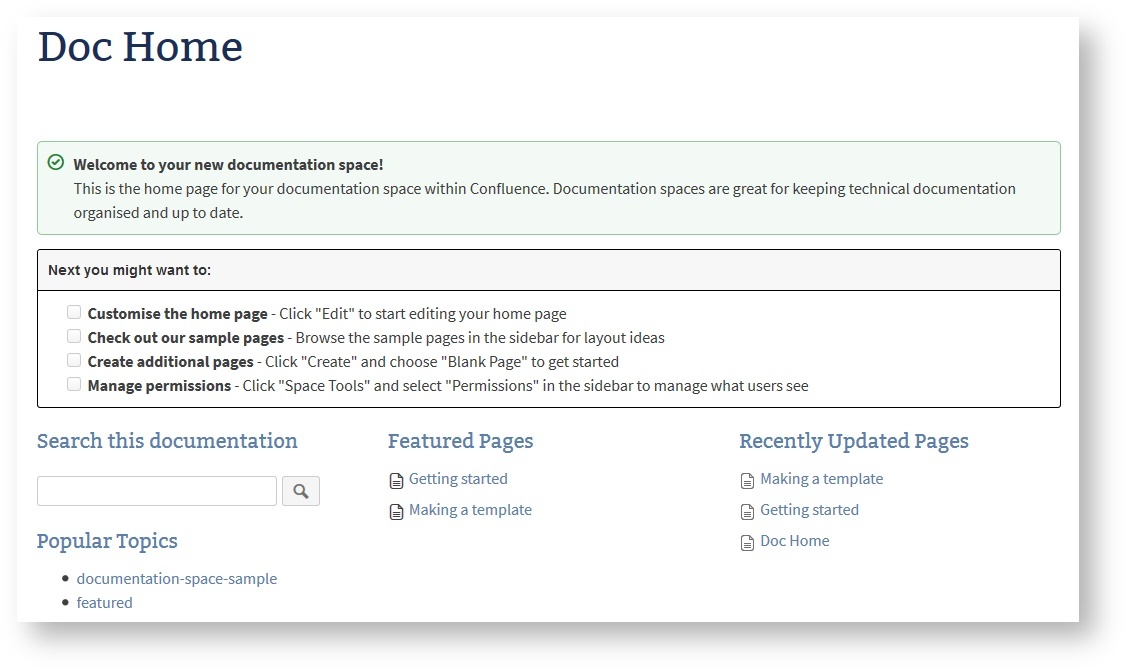
The upper half of both space homepages contains information for the space creator on what to do next. The lower half has a structure that is expected to be helpful during the lifetime of the space. It is usually the reason for selecting this type of space.
Having to remove the upper half is fine as long as you create a space only once in a while. But if you require to create spaces frequently, this is slowing you down heavily.
These spaces are designed to be used by beginners. Advanced users may define there own space blueprints. The following two sections introduce space blueprints based on the projectdoc add-on that you may install for free. Even the source code is available on Bitbucket so that you can fork them and adjust them to your specific requirements.
Note that you'll need a commercial or evaluation license of projectdoc to use the examples as is.
Workspaces
Spaces are a great tool to work collaboratively on a topic. Such spaces may only exist for a short period of time. Once the mission goal is accomplished, the new insights are extracted and copied to the relevant spaces of the wiki and the working space is either archived or discarded. We call these spaces workspaces.
Due to the fact that we work together on different topics, such spaces are created and removed quite often. These spaces have the same basic structure. There may be differences for different kinds of work - collect information about a topic, brainstorm on new products, run a spike on a technical problem, and so on. Each type of work may have its own space blueprint to get the team started quickly without much further ado.
Here is a simple example for a space a team uses to collect information about a topic. The space may or may not survive the end of the spike.
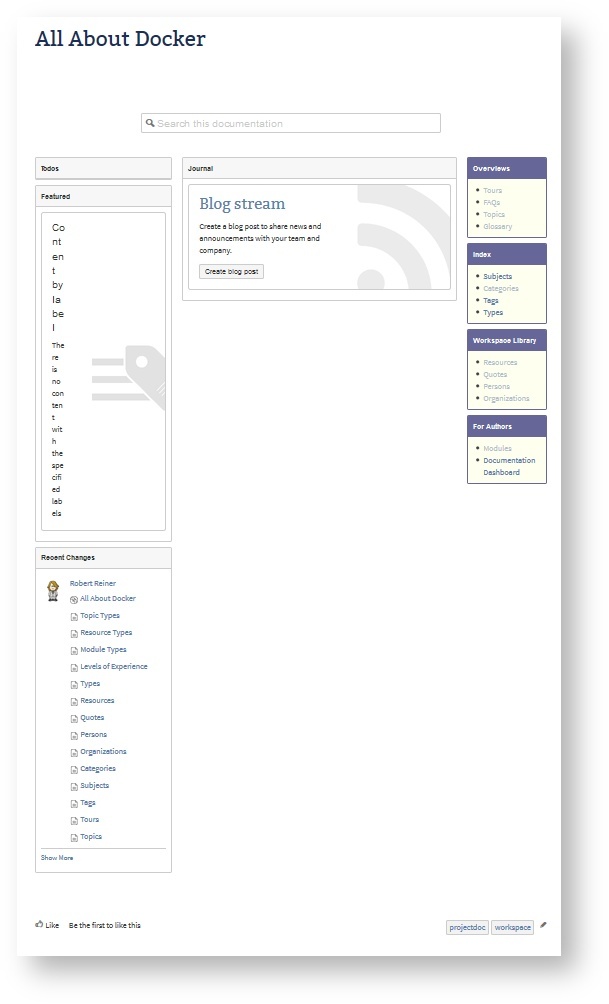 Resources, the glossary, references to experts are provided at the same location. Once the space is created the team is ready to add information. The important part is that the team starts working on the topic right away. They have a basic structure - they are familiar with - to add information collaboratively.
Maven Documentation Space
Here is another example that walks you through a space blueprint to create user documentation for Maven plugins.
Create the Space with the Help of a Wizard
First start the Maven Space Wizard and add the name and key to the space and the G:A:V coordinates to your released artifact (we assume that the add-on is already properly installed, i.e. has information on how to access the Nexus repository).
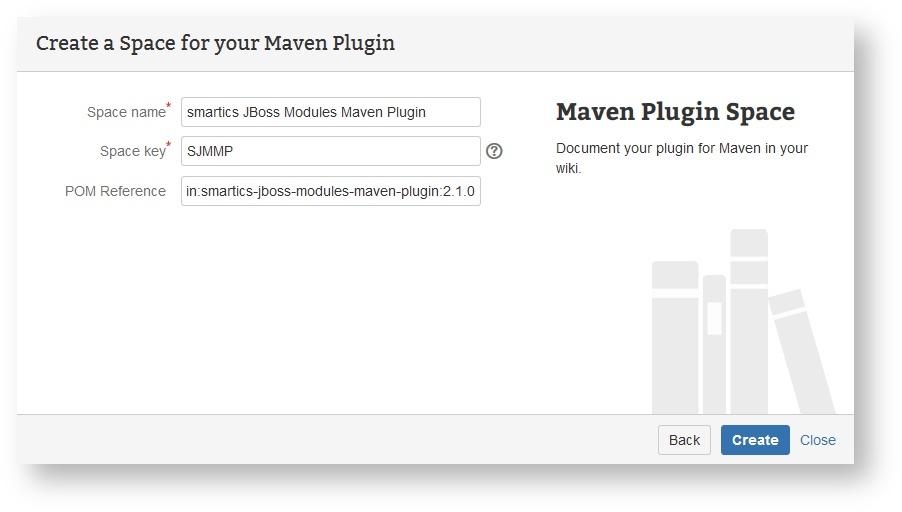
After hitting "Create" the generation process creates a collection of pages (besides the traditional homepages for document types created by projectdoc space blueprints).
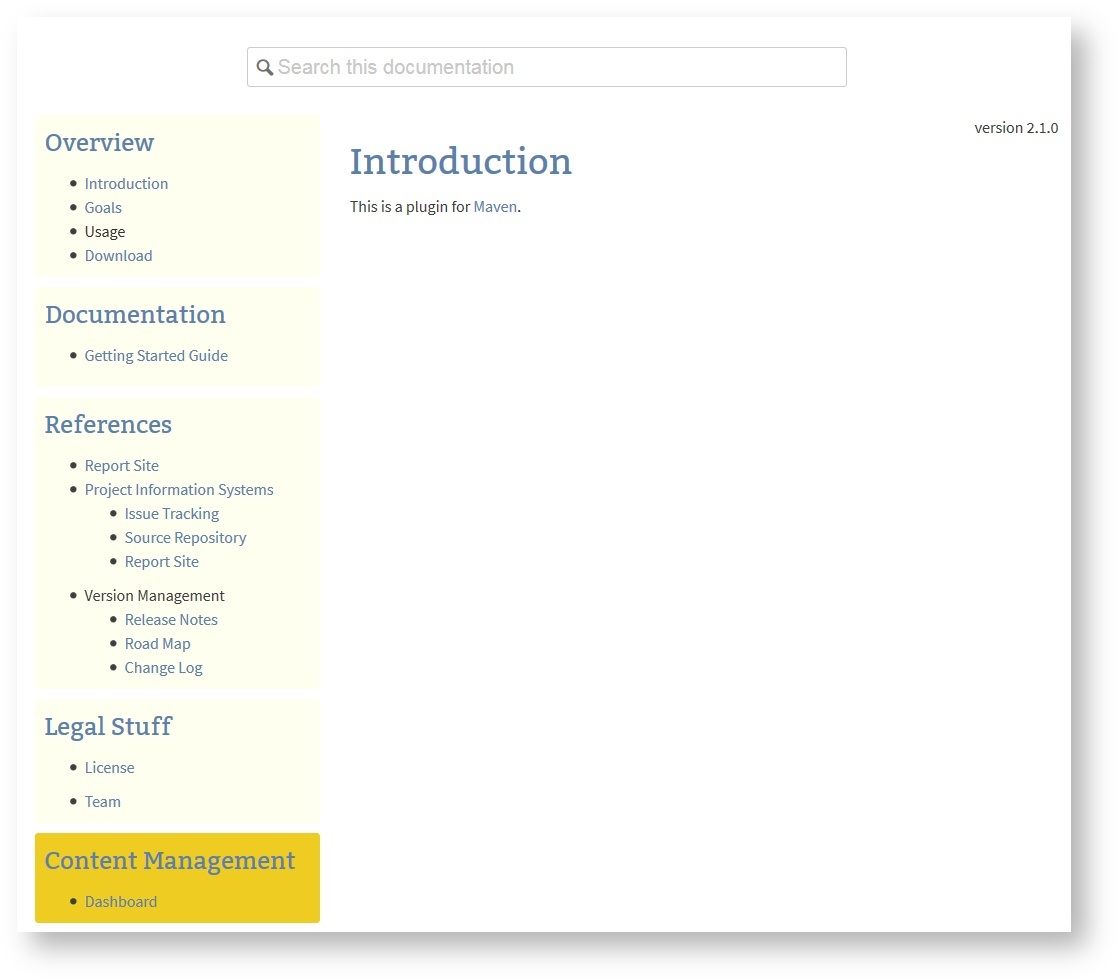
Space Homepage
Let's start with the homepage of the new space:
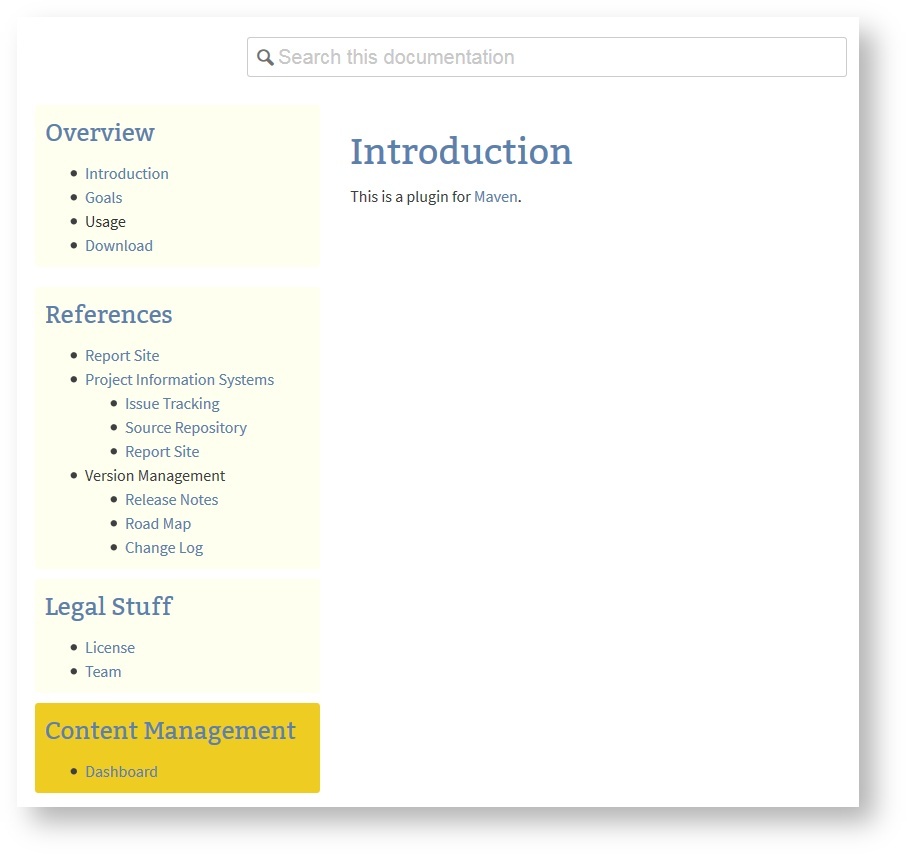
The space provides links to generates pages that inform users about goals and how to download the plugin.
Maven Goals Page
A space blueprint may create more than just on page. The goals page is generated from information found in the artifact's plugin descriptor.
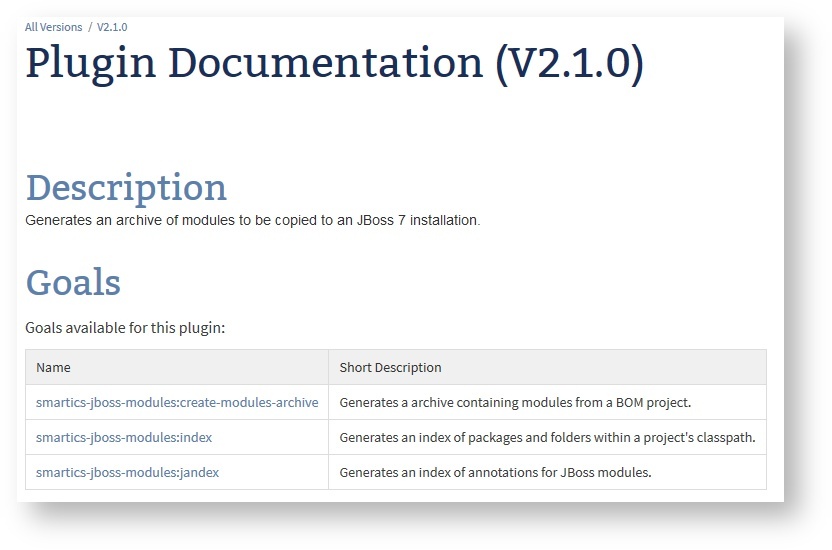
This plugin references three mojos that present their supported parameters by navigating to the mojo page.
Download Page
The space blueprint for Maven plugins also creates a page with information on how to download the plugin.
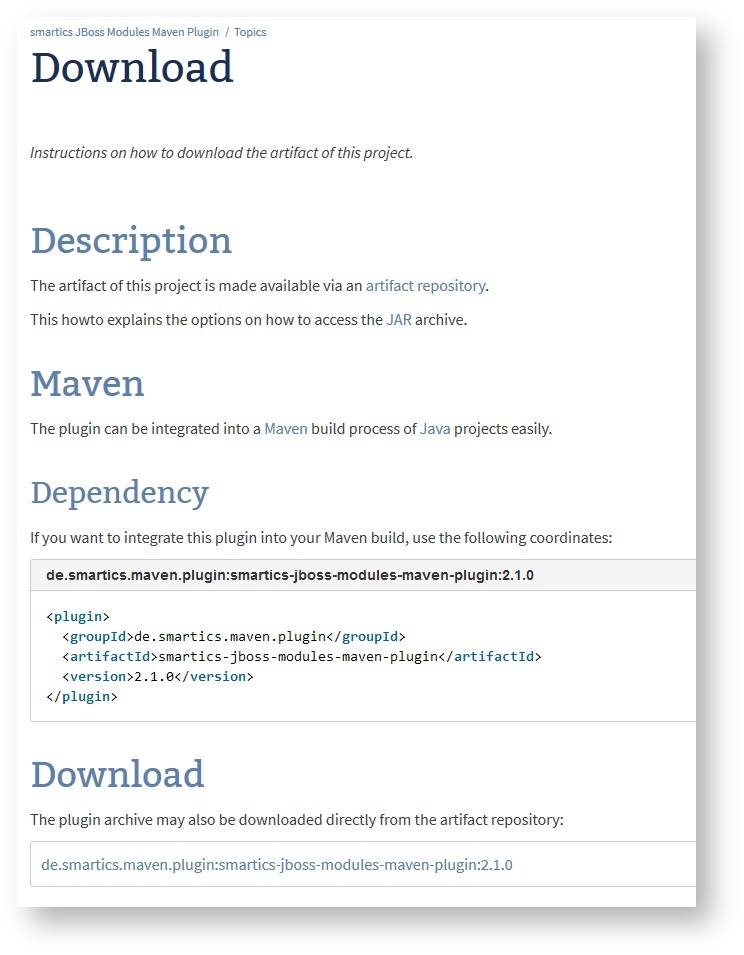
The download information is generated from the artifact's POM file. If the author switches the version to the next release, the links will update automatically at request time.
Tutorials, Howtos, FAQs
Now the team adds additional pages that contain information that cannot easily be generated. Think of tutorials, howtos, or FAQs.
Once you add more information, additional links will appear. Here is an example with a "Getting Started Guide".
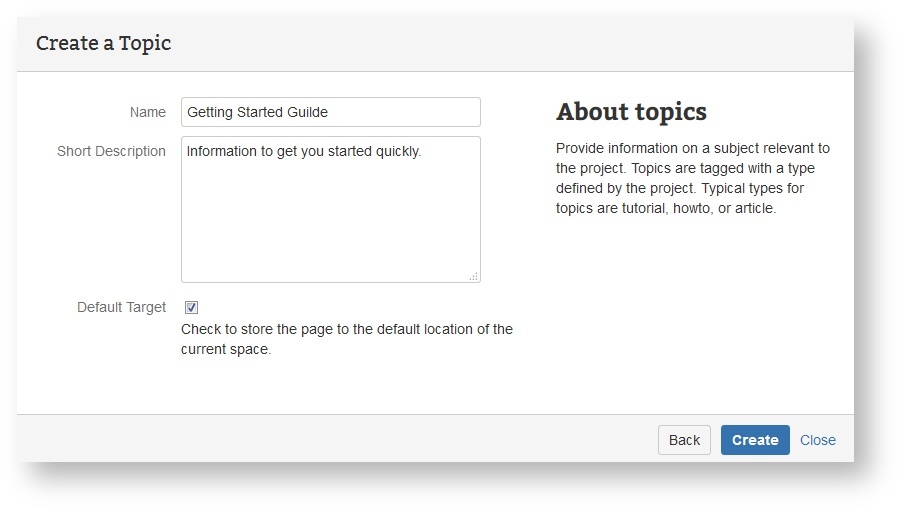
Tag the new document with the "Main" tag.
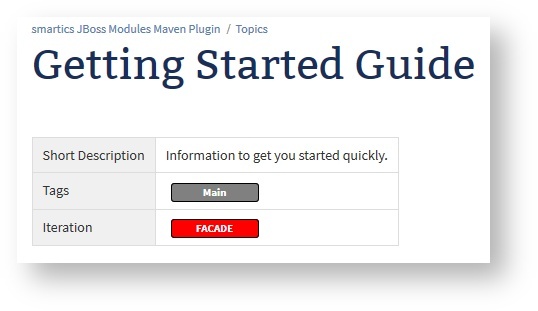
On the homepage of the plugin you'll find a new section named "Documentation" with a link to this new document.
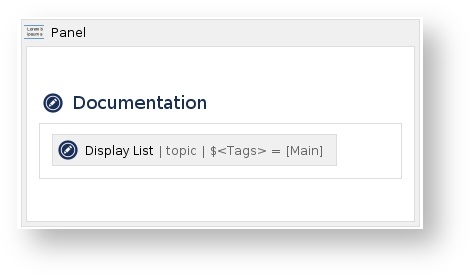
 Look behind the Scenes
How is this accomplished? Add a panel with a Section Macro that contains a Display List Macro. The "magic" is that if the display list macro does not have any hits, its content is empty. And if the content is empty, neither the section nor the panel will be rendered.
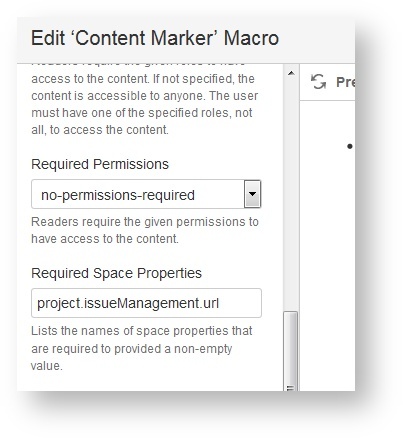
How can I render parts of a page only if some properties are set?
Use the Content Marker Macro to hide in the absence of a specific space property or permission.
External Links
Additional references are generated to point to the pages provided by a Maven site. These are links to resources outside the wiki.
If a page is not available, the macro can be configured to render the defunct link in an alarming red:
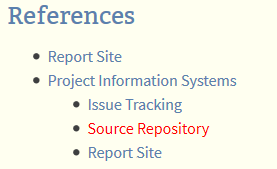
Links to non-existing Pages
You may also provide a link that activates, once a page is created. The Usage label is not a link, since there is no usage page in this space, yet.
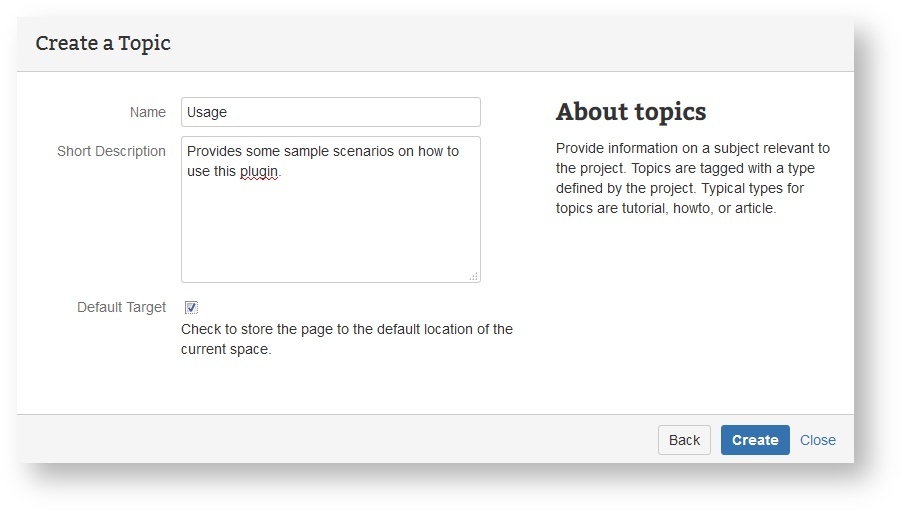
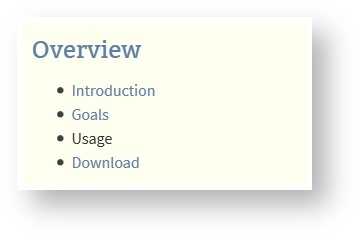 Now create that
 Usage page:
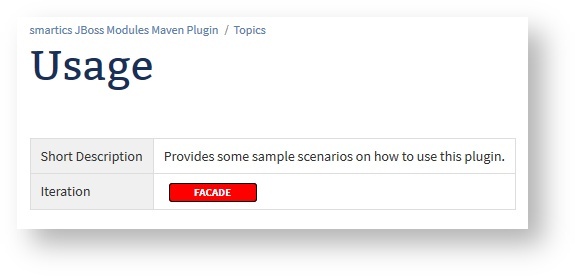
This is the new page rendered in the browser:
 A link to that page is rendered on the homepage (after reloading the page):
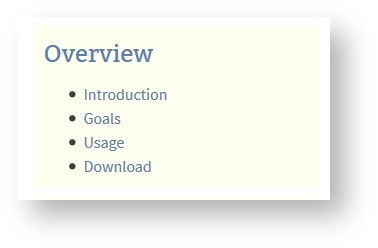
Conclusion
If you are creating spaces frequently it makes sense to invest on creating space blueprints that match exactly you needs. Teams may then create a space and start working on their task immediately. There is no need to manually adjust the created space and remove parts of the sample content.
In the previous article we have introduced a number of macros that support page blueprint designers. Now we have shown the Display List Macro, Section Macro, Content Marker Macro, and Wiki Link Macro in action.
Here are the take-away points of this short series of article on blueprints:
- Employ templates to support
- writers (concentrate on content not structure or layout)
- readers (familiarity with structure and layout for types of documents)
- Use Sections and other projectdoc macros to render only meaningful parts of your page
- Create spaces frequently
- Use blueprints that do not generate too much elements you have to remove after creation
- Use workspaces to collaborate on a topic
- Use wizards to create project spaces based on project metadata (like POMs or plugin descriptors)
In the first short article of this little three-step tutorial we introduced the concept of the Confluence space and page blueprints briefly.
One of the biggest time-saving tactics you can employ in your workplace is creating standardized content. Teams waste so much time every day creating documents from scratch or mindlessly scanning unstructured pages for the information they need. It’s time to stop reinventing the wheel.
Ryan Anderson. 3 Killer Features for Creating Awesome Page Templates in Confluence. (2013)
Blueprints are designed to get new users started quickly. Therefore they may contain instructional texts to help those new users to find out easily what to do next. For experienced teams this approach is not that optimal since users have to remove some boilerplate sections every time they create a page based on that blueprint.
The Reader's View
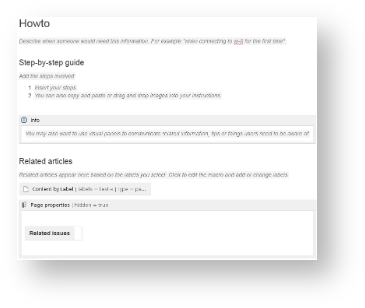
Here is an example from the Howto Blueprint provided by Confluence. If you launch the wizard and save, this is what you will see in your browser:
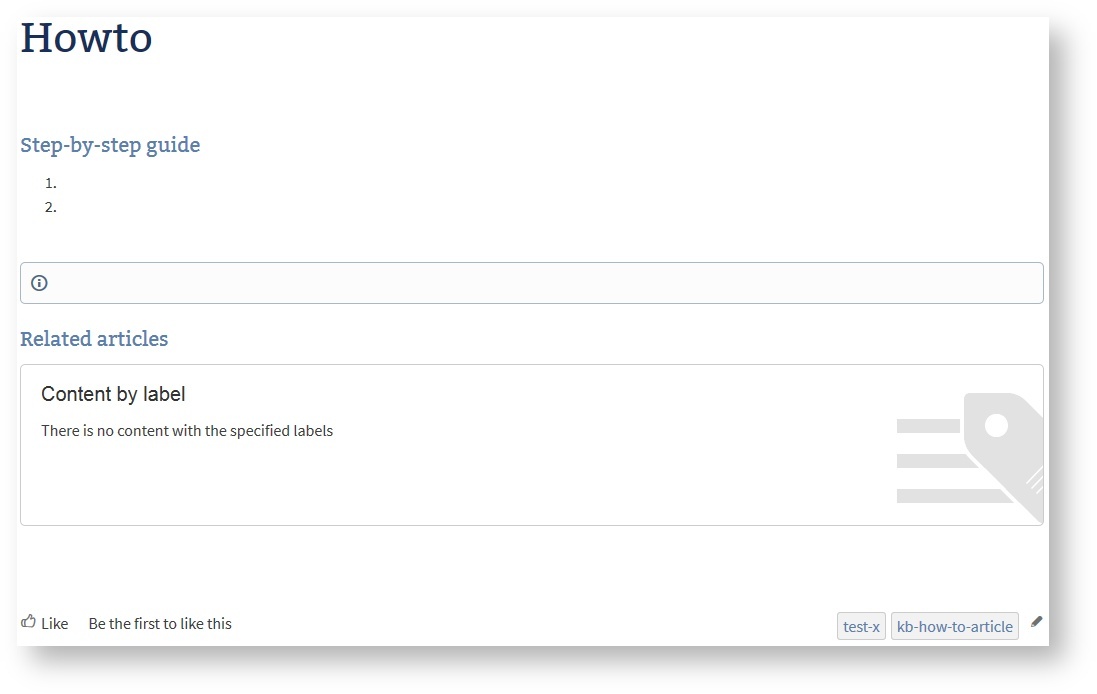
If your howto is not restricted to a simple list of steps (yet) or does not have related articles (yet), the author has to remove those parts from the page. If there is no relevant information, it would be easier for readers to not have to read anything.
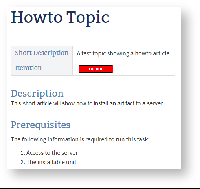
To accomplish this task use projectdoc's the Section Macro. A section is a text element with a title. Only if the section actually contains text, it will be rendered. So in the projectdoc version of the howto (based on the Topic Doctype) the page would be rendered like this.
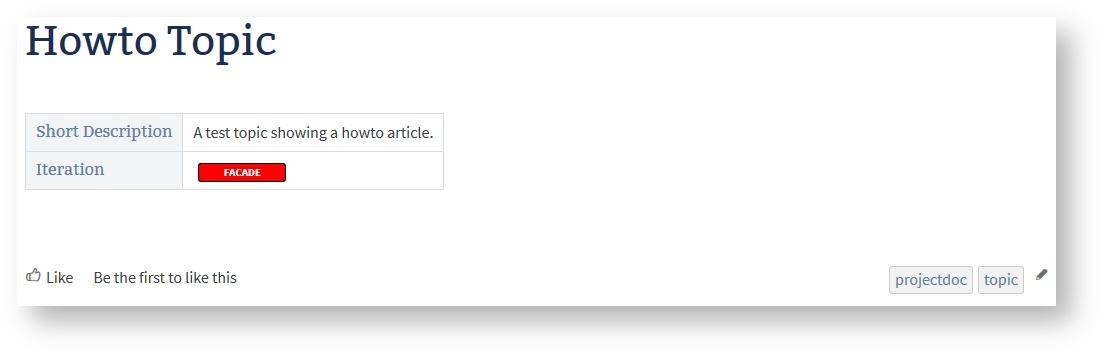
This page shows only information that is relevant to the reader. There is a short description that tells what this topic is all about and the Iteration property shows that in the Facade state only a name and a short description is provided, while additional information will be added soon.
The Author's View in the Editor
Here is the content in the editors. On the left you see the Howto Article for Confluence, on the right the Topic of projectdoc.
This is not about Howtos!
This example is not about the structure of the documents. It is perfect to design a howto with a concise representation of a numbered list of steps. This is often the most appropriate representation of a small number of action items. The projectdoc version assumes that you add a section that allows you to give examples or provide screenshots.
You may come to the point where you want both: Sections with detailed information and a table of contents that outlines the individual steps concisely. In this case you will probably define your own howto article template.
So, we do not want to discuss the perfect howto article structure here. Instead we point out techniques that allow to guide writers to create documents without cluttering the view for readers.
As you can see the projectdoc version of the howto article still shows the individual sections that guide authors to add new content (click the images to access a larger version). If you would have removed the content to not display clutter on your page, authors would have to search (or create) a howto document with the now required section to insert it where it is defined. This is more troublesome if you provide a larger number of sections to guide authors on what information may be added.
Think about Use Case documents which provide much information. Not every piece of information for a particular document is available or relevant right from the start. Documents evolve over time and may be edited by different authors at different times.
Add new Content
Once you add content to the section, the section will automatically appear.
The following screenshot shows three sections in the editor view, two of them with text content.

On saving the page, the two sections with content will be rendered. The section without content is still not relevant for the reader and therefore not shown.
Additional Tools
There are some more macros provided by the projectdoc add-on that support hiding content that is not useful to be rendered to a reader. Even more: once the content is available, the information will be rendered automatically.
| Macro | Short Description | Notes |
|---|---|---|
Marks a piece of content within a document. This content can be referenced for transclusion. | Marks an area to show only if privileges or space properties match. | |
Allows to render a link to a wiki page. | Links to pages that not yet exists may be rendered or may be suppressed. The link will show up once the target page exists. | |
Lists references to projectdoc documents in a table. Allows to select document properties for columns. Also non-list representations are provided. | A query that matches a number of documents. If no document matches, the macro is typically configured to render nothing. | |
Lists references to projectdoc documents in a list. List contain names and optional short descriptions. | Same as the table version above, but renders the hits in a list. | |
Renders transcluded content fetched from documents of a result set. | Also a query on pages to transclude that may be configured to render nothing if the query result is empty. |
With these macros authors are able to reference information that is added in the future. But as long as the referenced information does not exist, the reader is not burdened with reading page elements without information.
Conclusion
Templates are great since they help authors to create content with a similar structure. The template is a guide to overcome the blank-page syndrome and is a reminder of which information may be of interest for the readers. The template also helps readers to digest information more easily since it is presented in an expected manner.
We introduced some macros provided by projectdoc that help to create pages to support writers without cluttering the view of readers. Here is the list of all macros:
| Macro | Short Description |
|---|---|
Renders a section, if the body is not empty. Supports authors to create content, clutter-free rendering without empty sections. Allows to transclude the content. | |
Marks a piece of content within a document. This content can be referenced for transclusion. | |
Allows to render a link to a wiki page. | |
Lists references to projectdoc documents in a table. Allows to select document properties for columns. Also non-list representations are provided. | |
Lists references to projectdoc documents in a list. List contain names and optional short descriptions. | |
Renders transcluded content fetched from documents of a result set. |
The last article of this short series will have some tips on creating space blueprints. We will see some of the macros mentioned above in action.
Templates are great! If used wisely they support writers to concentrate on the content without bothering with layout or structure too much. If a template does not help the writer to deliver the valuable information efficiently, it should not be used. Otherwise your team ends up as a crowd of template zombies.
We are not saying that templates are necessarily a bad idea. In fact, they provide a very good way to transmit experience, particularly through checklists and a framework in which to ask questions. The problem occurs when the template becomes fixed in stone and the organization now assumes that every project is a carbon copy of the one that went before it.
Tom DeMarco. Adrenaline Junkies and Template Zombies: Understanding Patterns of Project Behavior
Pages generated by templates also support readers since they present a structure they expect. So this follows the Principle of Least Astonishment which helps users to digest information effectively.
Confluence provides templates in the form of blueprints.
With projectdoc we add some macros to support teams to define their templates more easily. There are a number of free additional add-ons based on projectdoc that provide a number of space and page blueprints. Furthermore these free add-ons are open source and available via Bitbucket. Software developers may fork them and adjust them according to their requirements!
In this article we give a brief introduction to blueprints and in two follow-ups we'll give some tips on how to use them to boost your productivity.
Features of Blueprints
These are the features of blueprints that help to create content collaboratively:
![]() Template authors define the basic structure for pages of a given type, such as howto articles. This helps teams to create content that is similar in structure and layout. This makes it easier for readers to find and digest information.
Template authors define the basic structure for pages of a given type, such as howto articles. This helps teams to create content that is similar in structure and layout. This makes it easier for readers to find and digest information.
![]() Confluence know blueprints in two flavours:
Confluence know blueprints in two flavours:
- space blueprints to create spaces
- and page blueprints to create pages.
![]() The Create Page or the Create Space Action open a dialog that shows all available templates. This makes it easy for authors to find out quickly which tools are available to create new content. By selecting a template the user starts a process to create a space or page of a given type.
The Create Page or the Create Space Action open a dialog that shows all available templates. This makes it easy for authors to find out quickly which tools are available to create new content. By selecting a template the user starts a process to create a space or page of a given type.
![]() The wizard guides the author through the creation process with explanatory texts and by asking for additional information that influence the content of the new page.
The wizard guides the author through the creation process with explanatory texts and by asking for additional information that influence the content of the new page.
How-to Article Page Wizard
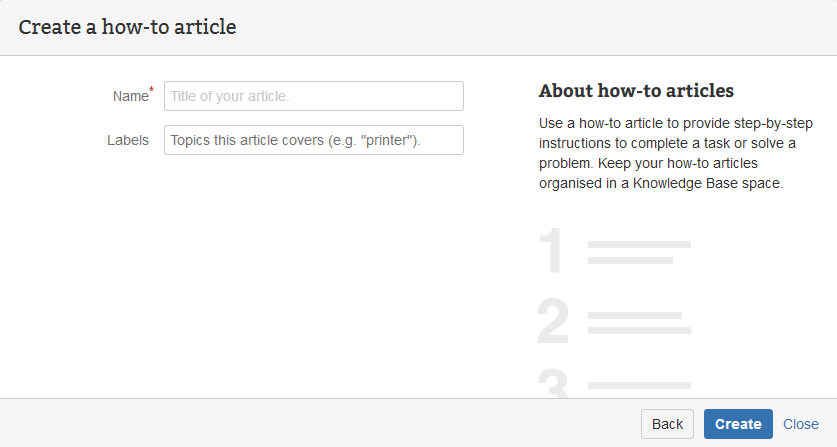
The page wizard asks for a name and labels to attach to the new howto article.
Team Space Wizard
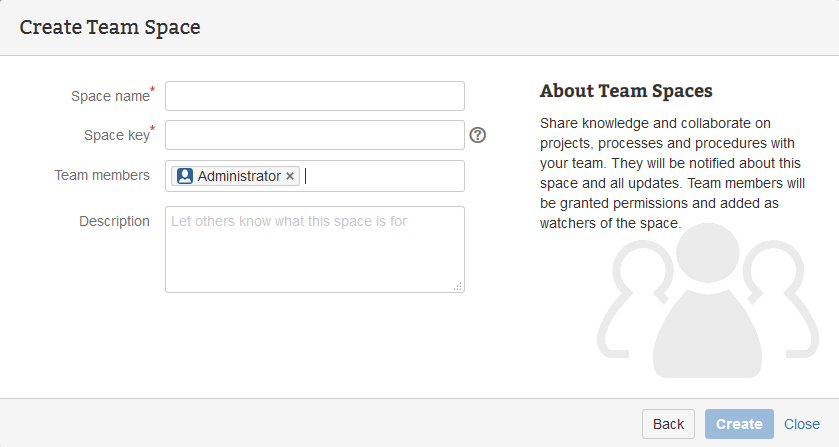
The space wizard asks not only for a space name and unique key, but also for team members and a short description. The template contains placeholders that get replaced with this information.
There are also some limitations to the concept of blueprints:
![]() For Confluence the created space or page is typically the end of the story. The generated wiki content is detached from the template. Any changes applied to the template do not affect the already generated space or page instances. If you need to apply a change to all existing pages you need to employ some scripting.
For Confluence the created space or page is typically the end of the story. The generated wiki content is detached from the template. Any changes applied to the template do not affect the already generated space or page instances. If you need to apply a change to all existing pages you need to employ some scripting.
![]() Blueprints are designed to get wiki users started quickly. Therefore they create content that shows how to use some of the features of Confluence. This may be great for new users, but is usually annoying for all others. The content that is not needed has to be removed manually. To workaround this problem you may create your own blueprints that reflect exactly what you and your teams need.
Blueprints are designed to get wiki users started quickly. Therefore they create content that shows how to use some of the features of Confluence. This may be great for new users, but is usually annoying for all others. The content that is not needed has to be removed manually. To workaround this problem you may create your own blueprints that reflect exactly what you and your teams need.
Let's delve into this last point deeper in the next articles and show some tools and techniques to help you to define your blueprints.
In the next article we will look into some macros to define page blueprints. The last article will have some tips on creating space blueprints.
Conclusion
Here are the take-away points of this article:
- Employ templates to support
- writers (concentrate on content not structure or layout)
- readers (familiarity with structure and layout for types of documents)
- Problematic may be
- updates to the template since the already created pages get not updated
- instructional text in the create page since it has to be removed manually
In the next article we delve into helping authors create content without distracting readers with cluttered documents.
Lost in wiki space? Blank-Wikipage-Syndrome? Where to add? How to find? No fun anymore?
projectdoc - as an add-on for Confluence - supports teams to communicate. Effective communication is essential for successful team work. Stakeholders communicate with each other and their future selves.
projectdoc focuses on indirect communication that is based on documents and records. We call the whole collection of these artifacts documentation.
projectdoc claims to support teams to create documentation that is
- easier to write
- easier to extend
- easier to reuse
- easier to navigate
- easier to search
- easier to read
Communication
Communication may be direct or indirect. Direct communication (collaborating on a user story map or talking to a customer) is usually preferred, because of its interaction options and its additional non-verbal channels.
Indirect communication (software architecture document or error codes report in a user manual) also has their benefits:
- it easily scales
- it works well with distributed teams
- it makes knowledge available on the long run
- it allows to be digested at the reader's pace
Certainly this is a big claim. Can we proof it?
Let's take a tour to the basics of projectdoc and explain why projectdoc makes using a wiki as a tool for team communication and collaboration much easier.
Here is the outline of this article:
Basics
projectdoc Document
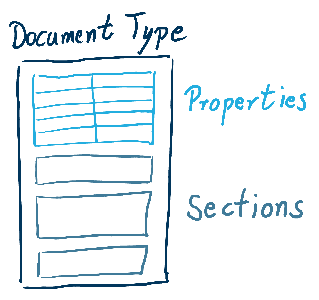
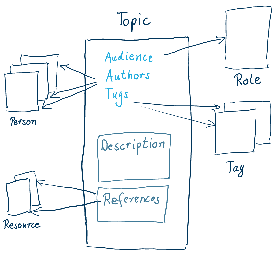
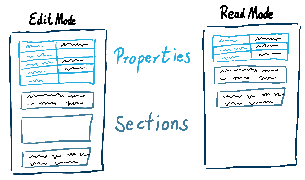
Every projectdoc page consists of two types of information: properties and sections. A Confluence page that contains properties and sections is called a projectdoc document.
Properties help to organize documentation by classification. They contain data and metadata about the information of the document. There are properties every document should have (e.g. name and short description). Other properties are optional (e.g. audience or sort key). Some are type specific (e.g. story points or resource type), some are globally used (e.g. tags and categories).
Sections organize the content of the document into referenceable units of titled text blocks. They can be transcluded and easily moved around (per drag-and-drop) within a document. Section do not get displayed until they have content in it. That is a great feature in combination with templates, as we will find out in the next section of this article.
Example: Editor with Properties and Sections
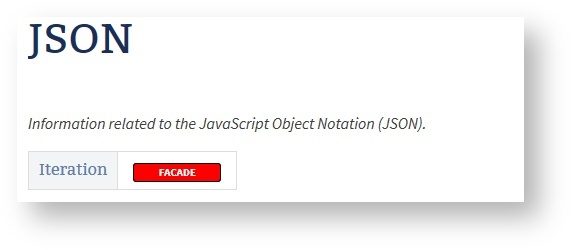
Here is an example showing the documentation for the tag named JSON in the page editor.
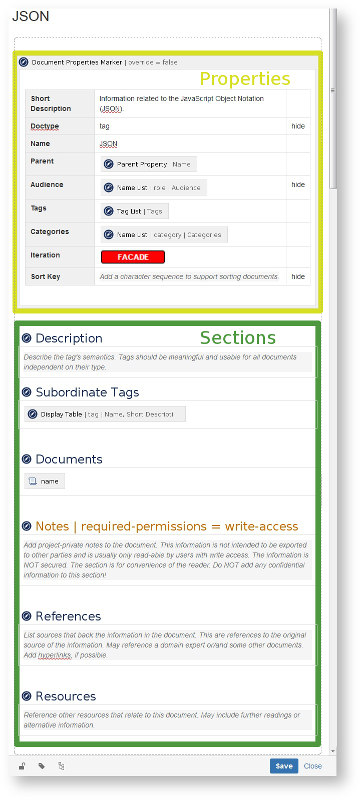
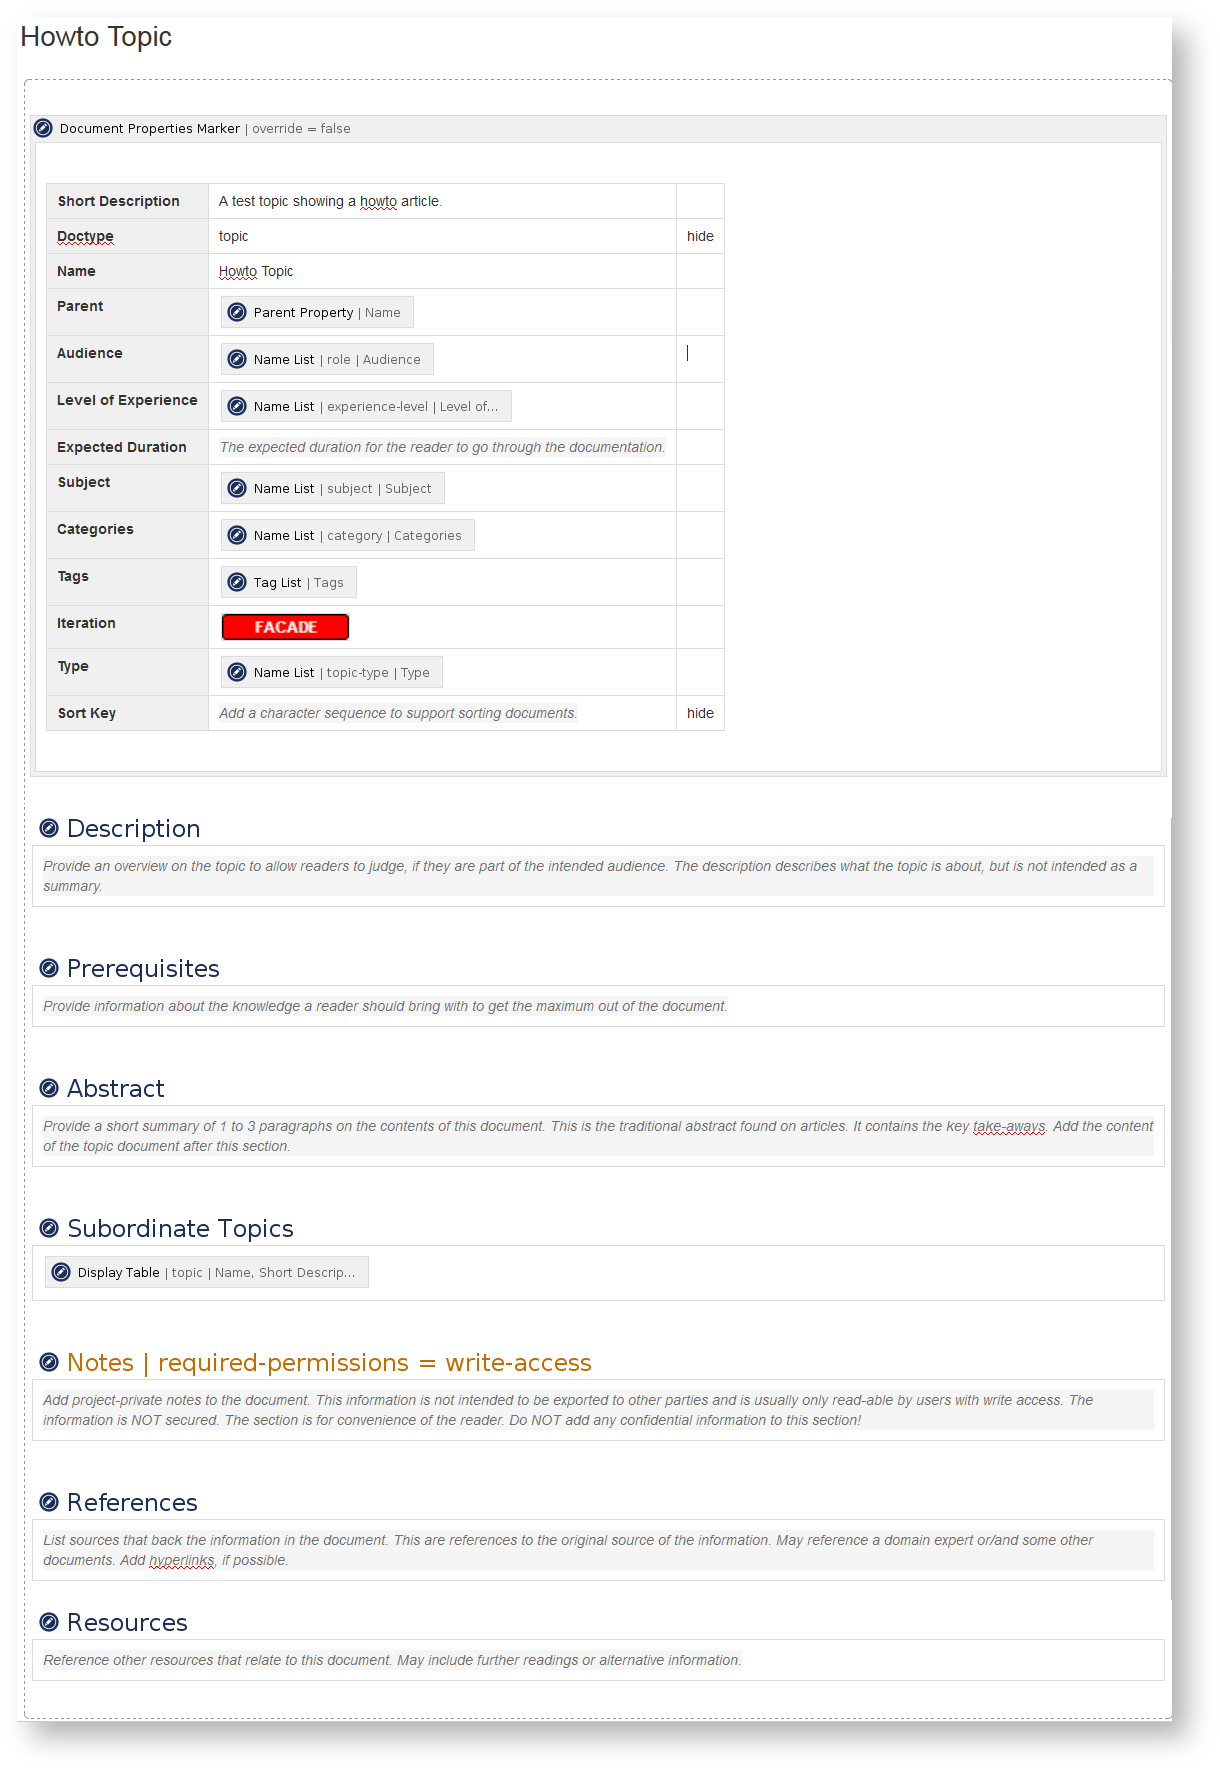
The Document Properties Marker Macro contains the document properties in form of a three-column table. In the example the following properties are shown: Short Description, Doctype, Name, Parent, Audience, Tags, Categories, Iteration, and Sort Key.
The sections of this document are Description, Subordinate Tags, Documents, Notes, References, and Resources.
You still may add any content to a page. Content is not required to live inside sections. Even with projectdoc Confluence is still a wiki ![]() .
.
Proof
projectdoc documents support
- easy writing by movable sections and a fixed structure on where to put properties and sections
- easy reuse by transclusion of property values and sections
- navigation and search by document properties (and some macros we introduce later)
- reading by not displaying empty sections
Doctypes
Doctypes define the properties and sections available for a document of a given type. They are basically templates that are implemented as Confluence Blueprints.
Doctypes reference document instances of other doctypes. The Audience property may reference Role documents or the Tags property lists references to Tag documents.
Since sections are only rendered when they have content, authors do not have to eliminate the sections they are not using right now. The guiding structure of the template is not lost for future additions.
The structure is not very strict. Confluence is a wiki after all, so we need some freedom to evolve. New properties and sections may be added at any time to the document instance.
projectdoc provides some suites of doctypes as free add-ons. Furthermore theses add-ons are available on Bitbucket so that you can download the source code and customize them to your needs.
projectdoc is not about providing templates for use. Your templates are your tools that have to match exactly your requirements to be most effective and efficient. Therefore it is unlikely that a given suite of templates fits your needs.
Instead, projectdoc is a set of tools to help you defines your templates. See the free add-ons not as a product to use from the shelves, but as a basis to design your own. While it is certainly feasible to use templates that do not touch the heart of your productivity as is, we encourage you to adjust the templates you work with every day to fit your needs as closely as possible.
If you have suggestions on improving the standard templates, just get in touch. We are continuously evolving our templates.
You are not limited to the document types we provide with our examples. Using properties and sections allows you to define any doctype you need for your team's communication.
Example: Tag Doctype
The following sample document is an instance of the Tag Doctype. It is the same as in the example before.
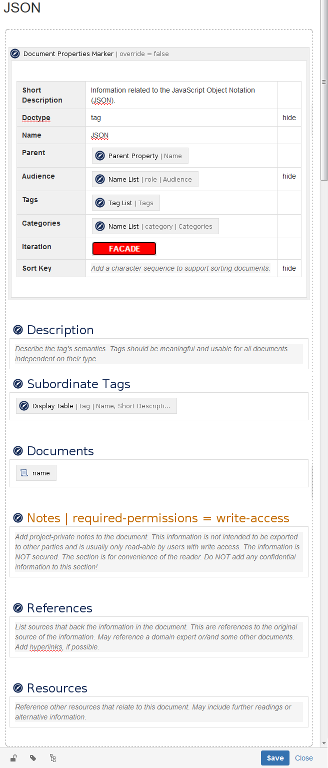
The Document Properties Marker Macro contains the table with property names (first column), values (second colum), and controls (third column). Keys are plain values and the hide control will suppress the rendering of the property even if there is a value specified.
The section Documents will render all documents tagged with JSON automatically. See the next section of this article for details on automatic lists.
Since only a few properties are specified and no section contains text, the rendered document is quite short.
 Once you start adding more information as properties and to the sections, the document is rendered like this:
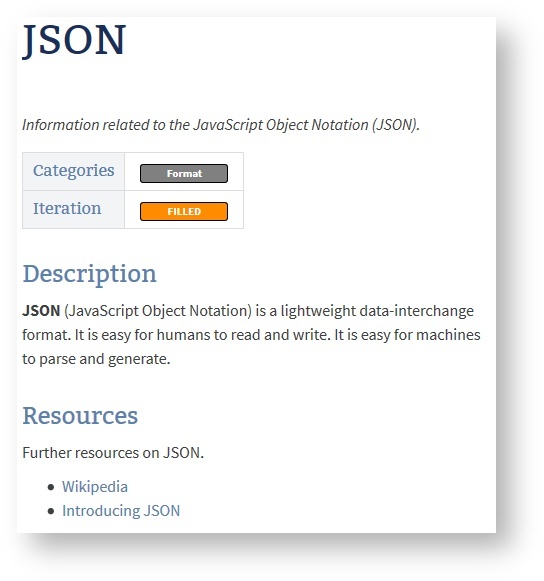
If you have defined a Category document called Format, the property value of Categories will render a link to that document automatically due to the use of the Name List Macro.
Proof
projectdoc doctypes support
- writing by proving guidance with templates
- extension by allowing to define any template you need
- reuse by creating new documents with blueprint wizards based on your templates
- reading by enforcing a team-defined structure on every document of a given type
Automatic Lists
 Be open for extension, but closed for modification. The open-closed principle for software development has its benefits also when applied to documentation. That is, if you add a new document any changes should be done to that document and not to existing documents.
For instance, if you define a document that lists all error codes logged by your application, you should not need to open the document with that list and add an additional code. Instead you define an automatic list in the document that collects all documents of type code and - as an example to show you how to further constrain the query result - tagged with public API. From now on every new code document you add to your documentation and tag with public API will be automatically listed. You may select on any property you have defined in your Code Doctype.
Every team member should focus on creating new documents and reuse existing information. This results in a modular documentation that supports collaboration.
Example: Display Table Macro
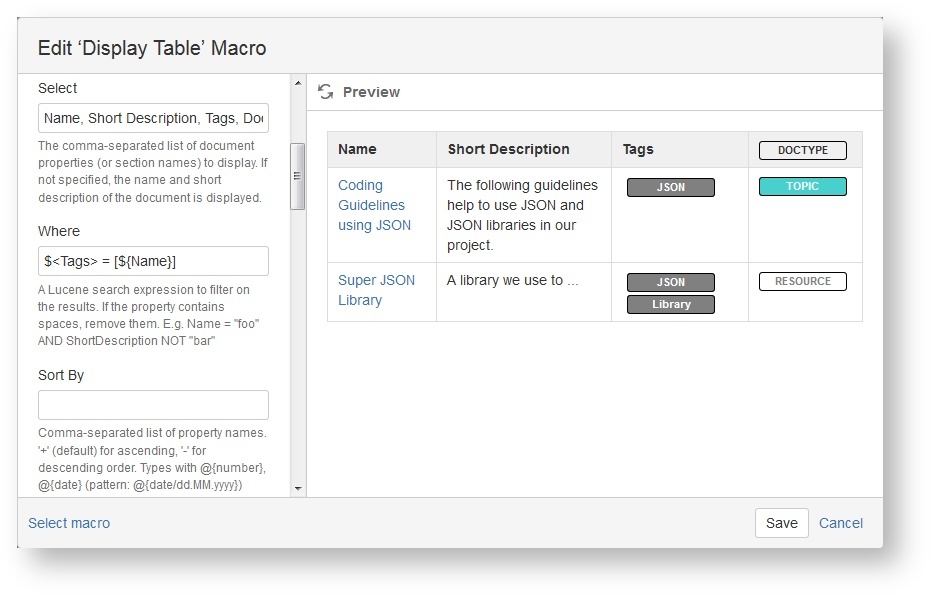
This example shows the Display Table Macro on the Tag document of the previous example. It selects the properties Name, Short Description, Tags, Doctype to be shown in its columns. The where clause selects on the Tags property that is equal to this document's Name property. If you would specify the query manually, you would probably use the following syntax:
$<Tags> = [Tag]
The somewhat unattractive syntax pretends that the query must use exact match. If this is not the case, use this (which is more easily understood):
Tags = Tag
For more information on query syntax, please refer to Search Tips.
Proof
projecdoc automatic lists support
- writing by defining queries on documents
- extension by automatically collecting documents that match the specified search criteria
- navigation by displaying links to related resources on a page
Transclusion and Referencing
![]() Every information is stored in a system that is best in working with it. There is never a one-size-fits all. You may store your stakeholder address information in an SCM and your source code in an LDAP. But the other way round may make more sense in most cases.
Every information is stored in a system that is best in working with it. There is never a one-size-fits all. You may store your stakeholder address information in an SCM and your source code in an LDAP. But the other way round may make more sense in most cases.
We strongly believe that there should be one access point for a project. That single address every stakeholder - be it the project sponsor, the team member, the customer, the user or any other interested party - remembers and finds access to the information she is looking for.
We suggest to use a wiki as this single point of access. Wikis are easy to add new information or to restructure the organization of your information quickly. This is important to adopt your tools to the way you want to work. Your mileage may vary.
There may be reasons to separate the information systems that provide access for different users, especially security or performance concerns. But we think that these requirements have to exist to define different access points. For small projects a single access point is typically the organization of information you should strive for simply for simplicity reasons.
To make information from remote resources available in a wiki, you need tools like transclusion and references. Transclusion grabs a part of a document and renders it within another. A reference is simply a hyperlink to an information in another document.
projectdoc provides a couple of macros for transclusion and macros for referencing.
Example: Transclusion Macro
![]() The example shows the Transclusion Macro that transcludes the
The example shows the Transclusion Macro that transcludes the Documents section of the JSON Tag document we introduced before. Note the border around the section. It is rendered only to users with write access and makes it easy to identify transclusions and navigate to the transcluded document.
projectdoc provides even more macros to transclude information (e.g. Transclude Documents Macro or Display Document Property Macro). There are also a number of macros to reference information, like the Javadoc Link Macro (to reference information in a Javadoc API), the Enterprise Architect Image Link Macro (to reference macros generated with the Enterprise Architect Maven Plugin), or the External Link Macro.
While referencing is fairly simple, transclusion may demand some extra calculation power. Check your target information architecture with your hardware thoroughly before you roll it out!
Proof
projectdoc transclusion and referencing support
- writing by reusing existing information
- extending by incorporating existing parts and add new information to that context
- reuse by showing existing content in different locations
Delegation and Search Spaces
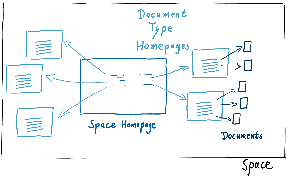 Sometimes the organization of pages in page trees within a space or in different spaces just is not enough. There is the need to arrange spaces and search information in a space group. You may also want to delegate the location of a new page to a space that is responsible for organizing this type of information for several teams.
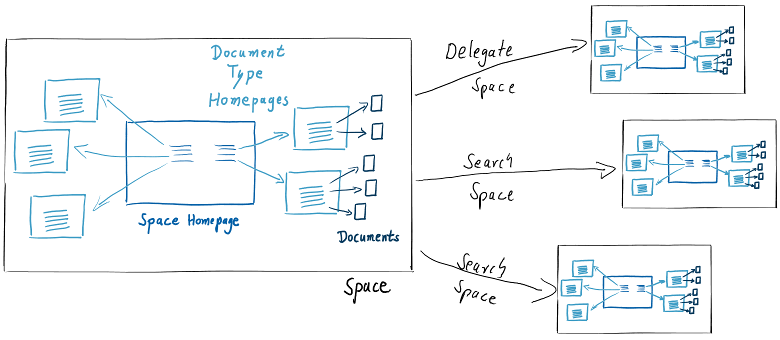
projectdoc provides the concept of delegate spaces and search spaces. A projectdoc space provides standard locations for standard information. Software developers know this approach well: if they use Maven they do not need to worry about where to look for Java sources, site information, or scripts. It's a convention, but reasons for not following them are very rare. The same approach is used to store view, use case, or minutes documents. There is a standard location known as doctype homepages. If you want to collect documents of a given type for a space in another space, you define that space as a delegate space. That is, if you create a document and want to send it to its standard location, this location is first looked up in the current space and - if that homepage cannot be found, the list of delegate spaces is traversed until the homepage is found.
If there is no homepage defined, the standard location is a child of the current page.
A search space reference extends the search of projectdoc macros. Not only documents of the current space are considered as matches, but also spaces found in the search space closure defined for that space.
Example: Space Property: delegate-space
 Delegate and search spaces are defined as Space Properties, typically on the homepage of the space.
Proof
projectdoc delegation and search spaces support
- writing since doctype homepages make it easy to add new documents
- extension due to adding existing spaces via delegation and search to new spaces
- reuse of information in existing spaces
- search of information in different spaces (note that there is currently no search macro that automatically expands the search space, so this feature is applied only to projectdoc macros)